Introduction
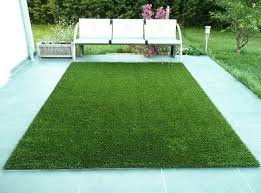
Are you tired of battling weeds, watering endlessly, and mowing your lawn? Installing artificial grass is a fantastic solution to create a low-maintenance, beautiful outdoor space. This comprehensive guide will walk you through every step, empowering you to DIY your own artificial lawn.
Let’s Get Started:
Step 1: Prepare the Ground
Before you start laying artificial grass, you need to create a solid foundation.
- Clear the Area: Remove existing turf, vegetation, rocks, and topsoil. A garden hoe and shovel work well for smaller areas, while a turf cutter is helpful for larger projects.
- Compact the Ground: Compacting the ground ensures a stable surface for your sub-base. A compactor is essential for slopes or uneven ground.
- Dig for Sub-base: Excavate 4-5 inches below your desired grass line to accommodate the sub-base and artificial grass.
Step 2: Create a Timber Perimeter (Optional)
A timber perimeter is especially useful for slopes, but can be beneficial for any installation. It provides a secure surface for the grass and prevents it from shifting. Make sure the perimeter doesn’t extend above your planned grass line to allow proper water drainage.
Step 3: Lay the Sub-Base
The sub-base is crucial for drainage and stability.
- First Layer: Apply a minimum of 75mm of crushed limestone aggregate, compacting it thoroughly with a compactor.
- Second Layer: Add a layer of fine stone or sharp sand (20-40mm) to create a smooth, level surface.
Step 4: Install Weed Membrane
Preventing weeds is key to a low-maintenance artificial lawn.
- Weed Killer: Spray the area with weed killer to eliminate existing weed seeds.
- Weed Membrane: Lay a weed control fabric over the sub-base. Ensure the membrane is overlapped by at least 100mm and secured to the perimeter.
Step 5: Unroll and Settle the Artificial Grass
It’s time to unveil your new lawn!
- Unroll: Carefully unroll the artificial grass, ensuring even distribution.
- Adjust and Settle: Align the edges and allow the grass to settle for at least 3 hours, ideally overnight. This minimizes creasing and wrinkling.
Step 6: Trim, Join Seams, and Secure
- Trim Excess: Use a sharp knife to trim any excess grass, ensuring clean cuts.
- Join Seams: Secure the seams of the rolls using joining tape and adhesive. Follow the manufacturer’s instructions carefully.
- Secure to Sub-base: Use the appropriate method based on your sub-base material:
- Sand/Lime: Landscaping or oval-head fixing pins
- Gravel: Landscaping or oval-head fixing pins
- Sand: Landscaping or oval-head fixing pins
- Concrete: Glue or Hilti nails
- Paving Slabs: Glue or Hilti nails
- Decking: Attach with screws
Step 7: Finish the Edges
- Trim Edges: Carefully trim the edges of the artificial grass, ensuring a seamless transition to your perimeter.
Conclusion:
Installing artificial grass is a project that can be tackled by DIYers of all skill levels. With a little patience and the right tools, you can transform your outdoor space into a lush, low-maintenance oasis.
FAQ:
Q: What is the best surface for laying artificial grass?
A: Compacted sharp sand is the most popular and effective sub-base. However, consider using thin padding or foam on hardscapes to protect the surface.
Q: How do I maintain my artificial grass?
A: Regular brushing with a stiff brush removes debris like leaves and soil, preventing weed growth.
Q: How much does artificial grass installation cost?
A: Costs vary depending on the sub-base, area size, and type of artificial grass chosen. DIY installation significantly reduces the overall expense.
Ready to embrace a beautiful, low-maintenance lawn? Start planning your artificial grass installation today!https://fartificialgrass.com/products/We are a professional artificial grass manufacturer in China.We offer free artificial turf samples. If you have any questions about artificial turf, you can contact us at any time and our team will provide you with a site plan and quotation plan.

